Thursday, November 15, 2012

Crack....aka Salted Caramels

Well...its that time of year when we all eat sooo much, I am starting to see cookies, candies, chocolates, cakes, pies, cupcakes....Its just that time of year....so I thought I would get into the spirit...I was making some caramel apples as a test for an event I am catering next month and when I was finished with the test...I had a pot full of caramel left....and I was trying to figure out...what I would do with it....and I decided...Well, I'll pour it out into a pan and sprinkle some sea salt on it and turn it into chewy salted caramel candies...and thats exactly what I did.

They were a BIG hit in the office. So you can give this a try and I promise EVERYONE will love it.
(BTW, the title is Crack because I actually don't like caramels....but if you put some salt in it...I apparently am ADDICTED to it :P)


Ingredients: 


1 cup (2 sticks) butter, room temp
2 cups brown sugar, packed
1 cup light corn syrup
1 14oz can sweetened condensed milk
2 tsp vanilla
1 tsp Sea salt (I use pink Himalayan sea salt…I think the actual fleur de sel might be even better)

Directions: 

  1. In a saucepan combine the butter, brown sugar, corn syrup, condensed milk. Bring to a boil over medium-high heat. 
  2. Cook and stir until the candy thermometer hits 244 (this is the temp for the chewy candies, but if you want it slightly harder, let it go to 248). 
  3. Remove from heat, stir in vanilla and 2 pinches of sea salt.
  4. To make the candy, I covered a rimmed rimmed baking sheet with aluminum foil and then buttered up the foil (you have to make sure you do a really thorough job with this or the candy will be forever stuck to the foil lols)
  5. Pour the caramel onto the baking sheet
  6. Then before it set, I sprinkled it with the salt (ok…so I actually forgot to do it before it set, since this was a last minute addition to what I was making, but next time, I’d sprinkle the salt on top so that by the time it set, the salt would be more trapped in the caramel rather than just sitting right on top)….if you don’t like the caramel right on top, you can mix it in….for a batch this size, I would put in 1 tsp and a little to sprinkle on top
  7. Let the caramel cool for about 4-5 hours. It will solidify in shape, but still be soft enough to cut
  8. Peel it from the buttered foil.
  9. Cut into strips about 3/4 inch wide, then cut into squares. (I used a pizza cutter to cut the pieces out)
  10. Enjoy....they are pretty irresistible....you probably cant just have one :P 

Wednesday, November 14, 2012

Butternut Squash Turnovers

I was trying to figure out the other day what to do with that other 1/2 butternut squash and then I randomly got an email from one of the zillions of newsletter/email/feed things for this butternut squash turnovers....isn't it weird how these things show up just when you need them. I of course had to mess with the recipe, so my version included  roasted butternut squash and mushroom medley (mix of  shiitake, portobello, straw mushroom, and crimini) , and caramelized onions with parmesan cheese wrapped in puff pastry. Takes a little bit of time to make but really delicious! Give it a try and let me know how it turns out! 


Ingredients:

1/4 cup extra virgin olive oil
1/2 onion diced
1/2 pound of shiitake mushrooms (i used some mixed mushrooms, but the shiitakes should be fine)
2 garlic cloves, minced
2 lb butternut squash, peeled, seeded, cut into 1/2 in dice
2 sheets of puff pastry
1/4 cup of shredded parmesan (you wont need all of it)
salt and pepper to taste

 
(the turnovers just before closing)


Directions
  1. Preheat oven to 375F. Toss the butternut squash with 2 tablespoons of olive oil and season with salt and pepper. Spread the squash on a rimmed baking sheet lined with aluminum foil. and bake for about 25 minutes until softened and starting to brown.
  2. In a skillet, heat the olive oil, add the onions and garlic and saute for about 5 minutes, stirring occasionally, then a add the mushrooms and cook until most of the liquid from the mushrooms has evaporated (about 5 more minutes). Season with salt and pepper. 
  3. When the butternut squash is ready, mix with the onions and mushrooms and set aside. 
  4. Take the sheets of puff pastry and roll out a little on a floured surface. The original recipe said you could get 12 pieces but, i only got 9 pieces which i felt were a good size. I basically cut them lengthwise along the fold and then cut each strip into 3 pieces. 
  5. Beat an egg.
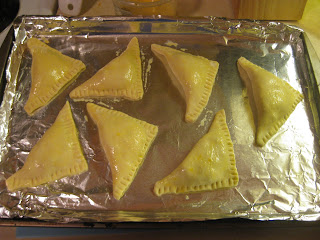
  6. Take a square of the puff pastry and lightly brush the edges with the beaten egg. Spoon about 1-2 teaspoon of the squash/mushroom mix onto the sheet. Add a generous pinch of parmesan on top. Fold the pastry over to form a triangle. Make sure the edges are sealed tight. Use a fork to decorate the edges (it really makes it looks prettier to do that so don't skip this step). Repeat until all of the pastries are done. 
  7. Using the remaining egg, brush the tops of each pastry. This will help the pastries to brown. 
  8. Bake in the 375F oven for about 25 minutes until golden brown. 
See, isnt it so pretty with the forked edges?
The tray of turnovers about to go in the oven.


Tuesday, November 13, 2012

Decadence

I love burrata....what is burrata you ask? Its a cheese...mozzarella on the outside with a mix of cream and mozzarella inside...its mozzarella only even better....but I never eat it at home....once in a while I might eat it at a restaurant, but eating at home just seems like too much decadence...but I was at Wegman's the other night and couldnt resist grabbing some.....


I was trying to decide what to do with it and I decided to eat it with some roasted beets....this turned out fantastic! Creamy burrata over the sweet roasted beets with a drizzle of olive oil and balsamic vinegar

Ingredients:

1 or 2 beets (depending on size)
burrata
1 or 2 leaves of basil
olive oil
balsamic vinegar, chiffonade
salt and pepper to taste

Directions:

  1. Roast the beets: wrap the beets whole/unpeeled with some salt and olive oil in aluminum foil and bake at 375°F for about 30 minutes. The actual time will depend on the size of the beets. Check for doneness by poking a fork through it. Let the beets, cool and then you can just pull/peel off the skin. You can adjust the temp from 325-400 if you have something else in the oven along with the beets, just adjust the time as necessary. 
  2. Dice up the beets
  3. Place the burrata on top
  4. Drizzle with olive oil, balsamic vinegar, salt and pepper, and basil
  5. Cut open and allow the cream/mozzarella to flow out onto the beets
  6. Enjoy!! 

Sunday, November 11, 2012

What a Fail....

OK. I was only able to keep it going for 9 days...sighs...what a fail...but I was just too tired on Friday night after coming home from grocery shopping and then I was busy all of Saturday...and today...I spent the whole day at home....cleaning....and putting together the drawers to my bed that I have been meaning to do since August....so I got alot accomplished this weekend...

I have decided that I wont be too upset with myself...I mean...blogging should be fun...not a chore, not a burden....so I hope my friend Jen wont be too upset with me....I will keep trying to post every day, but I wont beat myself up for missing a day here or there :P (hmmm....how convenient....lols)

Enjoy the rest of your weekend everyone!! :)


Thursday, November 8, 2012

Gettin' Saucy

OK. I just got home from a pumpkin beer and food tasting and I'm a little drunk and kind of tired....so this is going to be a short post. The pumpkin tasting was with the guys at DC's Smoke and Barrel (one of my fav BBQ places in DC)....who has this Chipotle Honey Butter sauce thing that I love...I could eat that over EVERYTHING....so this got me thinking about sauces I love...and I remembered I had those 2 sauces that I bought back from Peppers of Key West:  Blackberry Chipotle Sauce and a Pineapple Coconut Mango Tequila Sauce.


When I first bought these suaces....I was putting them on everything....you should definately get a bottle of each and give it a try...

The Blackberry Chipotle is a little tart, just a little sweet, and that lovely smokey spiceness of Chipotle tha I love. As for the other one....Pineapple, Coconut, and Mango are my three favorite flavors....and its got Tequila in it...how could it go wrong lols?


What can you do with these sauces you ask...well lots. For the Blackberry Chipotle I used it as a marinage and a sauce to pour over pan roasted duck breast (picture below), roast pork, grilled steak, and chicken.

The Pineapple Coconut Mango Tequila sauce....I cooked a little less with...but I did put it over chicken which was good but a little too sweet for me....What I found this was good in was baked brie (puff pastry wrapped around a round/hunk of triple cream brie, with the sauce poured over it, wrapped up and baked) ...OMG.....the sweetness of the sauce and the creamy fragrant brie was a match made in heaven.


Gotta go lay down now lols....and as always....stay consumed!!

Wednesday, November 7, 2012

Ranch Turkey Burgers

Its cold outside an it makes me want comfort food...thats probably noticeable from the meals/recipes I have posting this week lols....I had a pack of ground turkey in the freezer and figured I had better put it to use so I decided to make turkey burgers.

When I make burgers, alot of times I like to add a little bit of extra flavoring...this time, I used a packet of powdered ranch dressing. I have also used powdered soup mixes before--onion, beef, or mushroom are pretty good. It gives the burgers some extra flavor.  I also had an onion in the fridge that I needed to do something with, so I made some caramelized onions to go on top. Delicious and oh so comforting!


Ingredients: 

1 lb ground turkey (makes about 3 good sized patties)
1 packet of Ranch Dressing/Seasoning Mix
Salt and Pepper to taste
Slices of Cheese (I used Munster, but you can use whatever you want)

Directions: 


  1. Add the packet of seasoning mix to the ground turkey. Add salt and pepper and other seasonings if you want (garlic powder, chili powder if you want it spicy)
  2. Mix with your hands (dont overmix or it will be dry)
  3. Form into 3 (or 4) equal sized patties. Make sure that its not too flat (or it will be dry) or too thick (wont cook through). You can decided if you want 3 or 4 patties. I think 1/3 lb patties are good....1/4 lb patties are too thin lols....
  4. Cook in a little bit of olive oil. About 5 minutes on each side. 
  5. When the burgers are done, add a slice of cheese on top and give it a minute or so to melt and then place on the bun
  6. Add your choice of condiments (caramelized onions, mayo, ketchup, mustard, pickles, lettuce, tomatoes) and enjoy! 

Tuesday, November 6, 2012

Gnocchi Poutine

Today is a stressful day....I need to know who is gonna be the President for the next 4 years....but for now I have decided I'm not gonna watch the campaign results anymore....I'll just find out tomorrow....lols....but its been a stressful day...I stood in line for 2 hours in the very cold weather to vote, then I had a dentist appt and my gums, teeth, mouth still hurt :(  so I needed something soft...

So I decided to make this very easy gnocchi poutine...a Poutine is a dish from Quebec made from french fries topped with gravy and cheese curds. My version uses store bought gnocchi rather than french fries and I cheated even more...i used store bought gravy....you could make your own but I wasn't feeling so great so I cheated a little bit lols.

How can you say now to carbs with gravy and cheese lols. Its a super easy recipe....so give it a try...


Ingredients:

1 pk of store bought gnocchi (or you could use french fries or tater tots)
1 ball of fresh mozzarella, sliced
1 jar of store bought gravy
salt and pepper to taste

Directions: 

  1. Depending on what kind of gnocchi you bought you will probably need to boil the gnocchi or cook it a little bit in a frying pan.
  2. Add the gnocchi to a baking dish, pour the gravy over top, add salt and pepper and stir
  3. Layer the slices of mozzarella on top
  4. Cook at 375 for about 30-40 minutes until the mozzarella melts and browns  

Ok...you can now go back to hitting the refresh on your computer trying to figure out who won the elections.

Monday, November 5, 2012

Punkin' Time: Chicken Pumpkin Chili

Its cold outside....its been like that for a few days....this can only mean 1 thing! Its time for all the pumpkin recipes to start coming out....I love pumpkin anything.....Pumpkin Beer (this one is AMAZING), pumpkin pie, pumpkin tarts, Cheesecake Factory's Pumpkin Cheesecake, pumpkin, pumpkin, pumpkin!!!

The first thing I thought I would try was a Chicken Pumpkin Chili....Its an amalgamation of like 3 recipes I saw...I was going to make it for a work potluck, but I ended up getting stuck in FL and I had already bought all the ingredients...so I had a lot of pumpkin chili alllllll to myself lols.

My version of this has chicken and butternut squash but you can vary the meat with beef, bison, turkey, pork....I think this recipe will basically work with any type of meat. I didnt put any beans in this cuz I dont like beans....but, I think beans might actually be good in this too. This ended up being super yummy and easy. I used the slow cooker, cut everything up, threw it all in the slow cooker before I left for work and by the time I got home....the house smelled yummy and dinner was ready! My favorite kind of meals--easy and delicious!

A quick tip for getting the flesh/meat of the butternut squash out....use a peeler and peel the skin otherwise it'll be really hard to cut thru the squash.


Doesn't this look delicious....It was nice and smoky from the ancho and chipotle chili and spicy from the green chilis but slightly sweet from the pumpkin and the squash....soooo good! I am a little sad that I forgot the sour cream! Give this a try and stay consumed!


Ingredients: 
1.5 lb of chicken cut up into small chunks
1/2 butternut squash cut up into small cubes
15 oz can of pumpkin puree
4 oz can of green chilis (you can put in as much as you want depending on how spicy you want it)
2 14 oz of fire roasted tomatoes
1 bottle of pumpkin beer
1 tsp of cumin
1/2 tsp of ancho chili powder
1/2 tsp of chipotle chili powder
   (you can skip the ancho and chipotle powder and just use regular old chili powder if you want...
      but i really liked the smokiness they added.)
2 cloves of garlic, very finely minced.
quick sprinkle of nutmeg
salt and pepper to tatste
1 can of corn or about 1.5 cups of frozen corn (optional)
Sour cream (optional)
Shredded cheese (optional)

Directions: 

  1. Combine the pumpkin puree, green chili, fire roasted tomatoes, pumpkin beer, chili powders, garlic, nutmeg, salt and pepper in the crock pot. 
  2. Stir to mix everything together
  3. Add the chicken and butternut squash and stir to combine. Make sure the butternut squash is submerged in the liquid to ensure that it is cooked through. 
  4. At this point you can sprinkle the corn on top if you arent going to be home until 8 hours later....If you are going to be watching your crock pot, then wait until about 4.5 hours in before you add the corn so it doesnt get too mushy. 
  5. Cook on low setting of the crock pot for 6-8 hours. 
  6. When you are ready to serve, you can serve with a dollop of sour cream and sprinkle of shredded cheese. I also saw in one of the recipes you could mix a little cinnamon or pumpkin spice into the sour cream before serving it too. 


Sometimes I Dream About this Potato Salad

I went to the buffet with my parents today...I hate most buffets because there isn't usually anything really good at them....but I go anyways because my parents LOVE it....they're like kids in a candy store when they get there...how could I deny them that....

But anyways....I went to the buffet with them tonight...there is usually this potato salad that they have that is passable--as in...something I would actually choose to eat...but for some reason it didnt taste any good today....how disappointing....but it got me thinking about this potato salad I made a while ago.....it was THE BEST potato salad I have ever had.....the potato salad to end all potato salads. This was even better than my momma's potato salad...even though her salad is mayo-based and very different from this one so I feel like you cant really compare them.

The recipe came from a blog that I love/hate....I love that The Cookbook Blog goes through sooo many recipes in one cookbook, but I hate that he doesn't share the recipes so if there is something I want to try...I either have to buy the cookbook or search high and low for the recipe (although I totally understand....it must be some sort of copyright issue and it is kinda unfair to the cookbook authors).  The original recipe came from La Cucina: The Regional Cooking of Italy.  {side note: I really want to buy this book, but I do hate that there are no pictures.....perhaps I shall put it on my XMAS list :P). The book says the recipe is from the Liguria region of Italy.


It is super easy and really really delicious. The flavors melded together so amazingly well...the tart sweetness of the tomatoes, the freshness of the cucumber, the salty briny-ness of the anchovies (Yes....I know....eeeeewwww anchovies???!!! but it is sooooooo good in this recipe!!!)  and olives, and the fragrant citrus-y notes in the yummy olive oil i used. It is really important to use GOOD quality ingredients here because each ingredient brings so much to the table....get the good tomatoes and use the good olive oil. I also used really fresh eggs from the farmers market and made them soft boiled. I'm drooling just thinking about it!!!

Give this a try and I promise you wont be disappointed....as always....stay consumed!

Ligurian Potato Salad 

Ingredeients: 
1 lb Plum Tomatoes, sliced
1 Cucumber, sliced
2 Potatoes, boiled, cooled, and sliced
  {I used 5 or 6 small red skinned potatoes}
1 Chili Pepper, sliced
  {I didnt use a chili pepper, i did sprinkle it with a very very light sprinkling of red chili pepper flakes}
1/2 c Green Olives, pitted and diced
5 Anchovies, chopped up very finely
A few basil leaves, chopped
3 Tbs Olive Oil {remember...use a good olive oil!)
2 Tbs White Wine Vinegar
2 hard boiled eggs, cut in sections
  {I used soft boiled and I feel like this really added to making it the best potato salad ever!}
Salt to taste
 {I didnt need to add any additional salt as the anchovies and olives are already salty enough}

Directions:

Combine tomatoes, cucumber, potatoes, chili pepper, olives, and anchovies. Mix Olive oil, vinegar and basil and pour over the potatoes and toss gently. Top with eggs and serve.


Sunday, November 4, 2012

Philadelphia "Sushi" Bowl

** Udpate: GAHHHH....this was supposed to post on Saturday.....I just took a look and realized it only got saved as a draft and for some reason didnt actually post..... Boo .....does that mean I already failed National Blog Posting month :*(

OK. So this post is a little bit late...but I was busy all day making cookies and cake pops....and since I havent gone to bed yet...I still consider it the same day lols....

This is a recipe that my roommate for a month taught me...if you like the smoked salmon with cream cheese sushi (often called Philadelphia roll) you will like this too. Since I learned the recipe over the summer, I have made it a bunch of times....and its super simple and totally hits the spot when I am having a sushi craving...

All you need is some store bought smoked salmon (i like the kind that comes in the blue package from Trader Joe's), cooked sushi rice, cream cheese, cucumber, a little bit of sushi rice vinegar, and dry seaweed (optional). Cook the rice according to the instructions and mix with a little bit of the sushi rice vinegar. You just need a little vinegar, just to give the rice a little tartness and to loosen it up a bit. Then mix it with the cream cheese and crumble a few pieces of seaweed on top and lay as many slices of the smoked salmon you want on top and a few slices of cucumber. In the version in the picture below, we also added some popcorn shrimp.

This has become one of my favorite meals since it kind of satiates the sushi craving but I dont have to go out and spend $50-$60 on sushi :)

Bedtime for me.....stay consumed!


Friday, November 2, 2012

Consumed by Music: Will Hoge

Today's entry is going to be a short one (I have to go bake and decorate 40 cookies and cake pops for an event this weekend) and its not even food related!

When I started this blog it was supposed to be about food....but I also knew that my life is consumed by other things...and today....I was consumed by music....the music of Will Hoge to be exact. I spent the day listening to his music...if you dont know who he is....go check him out at http://willhoge.com/wired/

What actually started it was I saw that Will's song Even If It Breaks Your Heart which was recorded earlier this year by the Eli Young Band was nominated for the 46th Country Music Awards for Song of the Year...it  remind me how much I love Will's voice...so I spent the day listening to his music on Spotify.

Even If It Breaks Your Heart is the story of how Will got inspired by music, his touring, and the blood, sweat and tears he has put into his music. Despite the fact that he has yet to "hit it big" the song is not about set backs but about his determination and his optimism.  It got me thinking how amazing Will's voice is...how everytime I hear it, I get drawn in to the song and how I can feel the raw emotion coming from him as he sings. This man is in a word...AMAZING. I just don't understand how he hasn't "hit it big" yet.

The Eli Young Band's recording of the song is great and I love that it gives Will some exposure...but no one can sing this song like Will. With every word you can feel the emotions, the love, the time, the dreams that Will has invested.

Take a listen to the 2 versions and let me know  if you agree. Let me know which you like more.

Will Hoge version:
Eli Young Band version:

Thursday, November 1, 2012

Eat the World at Epcot Food and Wine!

Today's post (as well as several of the following posts) will be inspired by the time I spent in FL with Jen and her family (who graciously took me in for a few more days when Hurricane Sandy cancelled my flight home on Monday). Years ago, when Jen and I were both at UMD, she mentioned that she was planning on going to the Epcot Food and Wine Festival with her parents and hearing that I had never been to Disney before (for shame :O!!) she asked if I wanted to join her and her parents. That first experience was so much fun that her and I had planned on making it a yearly tradition...but alas....the following years plans were thwarted by hurricanes, work, life, etc and it wasnt until this year that we finally go to go back.

If you have never been to Epcot before, it is one of the Disney parks. You walk around the park and you are immersed in the history, people, and culture of each country. The Food and Wine Festival, held each year over several weeks in Oct and Nov, offers visitors a chance to experience not only the culture of countries of the world, but also the delicious food. Its definitely a foodie's idea of heaven.


This year's festival included food, wine, and beer from 20 countries as well as 9 other stands for specialty items like cheese, wine, and craft beers. We stopped at more than half of the countries. Below are some pics of my favs!


Argentina: Grilled Beef Skewer w/ Chimichurri Sauce


China: Mongolian Beef in Steamed Bun


Poland: Kielbasa and Potato Pierogie and Zapiekanki (Mushroom, Carmelized Onion, and Cheese on Bread) 

The other two things that I absolutely loved (but forgot to grab a picture of) was the Coq au Vin (Red Wine Braised Chicken) at the France booth and the Le Cellier Wild Mushroom Beef Filet Mignon with Truffle Butter.


Make sure you stay for the fireworks at the end of the night. Its absolutely beautiful.


Here is a photo of Epcot's iconic Spaceship Earth lit up at night.


Tips for Epcot Food and Wine:

**If you dont want to keep pulling out your wallet at each stand,   you can purchase a pre-paid debit card with whatever amount you want on it. This is also good for helping you to keep on budget

**Get one of the discovery passport booklets. It has a list of all of the booths and the menu and drinks available at each. Its a great way to figure out what is available and also a fun way to commemorate your day as each country/booth has a special stamp which you can collect. 

National Blog Posting Month


I know this blog has been back burner-ed for many a months now...but this past week, I have been in FL visiting my friend Jen from the Beached Scientist blog....and she has challenged/inspired me to participate in National Blog Posting Month.

NaBloPoMo 2011 

The challenge is to make at least 1 post a day....so I am going to give it a try.....not sure if it will work, but it gives me a good excuse to keep working on the blog. Don't worry....this isnt my post entry for today....stay tuned for today's post!